Why RAW is AWESOME and why YOU should use it.
I get a lot of questions from the reef community about my aquatic photography. People always want to know what settings I use and what equipment I own. I can answer that very easily, but it’s not really going to help anyone. Settings are changing constantly depending on what I’m shooting, and any DSLR and macro lens will work just fine. What I try to tell people but it usually doesn’t sink in, is if you already have the basics of photography down, shooting in RAW and learning how to process your own photos will make the biggest difference. Hands down. You can be shooting with the best DSLR and lenses available, but if you shoot in Auto mode and let the camera churn out
WHAT IS RAW?
Let’s take a step back for a moment… what is Raw? It’s not an acronym, and it’s not a specific file type like JPG or TIFF. It means that the image/data that is created is in it’s purest form and it contains ALL the pixel information because the file is uncompressed. Yes, your camera may have options for compressed raw and uncompressed raw but the difference between the two is minimal and I’m not going to get into that here. If you want to save some disc space just use the compressed raw format and don’t worry about it. You need software like Adobe Lightroom to process your photo and make any necessary adjustments.
In comparison, jpg is a highly compressed file and much of the pixel information is tossed out the window. And the process, the camera has automatically applied certain settings/changes to the image before you even see it. Is this what you want happening? Maybe sometimes, like when you don’t want to spend a lot of time post-processing because you just spent all day shooting an event and now have hundreds of images to go through and get to the client so you can get paid. But if you decide you do not like how the image turned out and you want to make some changes, you are working with much less pixel information. Depending on how extensive those changes need to be, you may not end up with the cleanest image possible and you may not be able to fix one thing without ruining another.
So if you are not shooting massive amounts of photos like a wedding photographer, I highly suggest you shoot in raw format. Since this blog is focused on reef aquariums and mainly reef photography, I’m going to say that you really have no reason NOT to shoot in raw format.
OPTION A
Think back a few years to film cameras. You basically had the same two options as you do today with digital. Option A was to shoot in full manual mode (or auto if you had a fancy camera), you hit the shutter button and a basic image was transferred to your film in the form of a negative. When you were done you would drop your negatives off at the photo lab to be developed. When you chose Option A and dropped your film off, you were letting a machine apply automatic corrections to exposure, white balance, etc and what it spit out was what you got. Feeling lucky? This was fine for most people who were just recording an event, like Aunt Agnus’ 70th birthday party.
OPTION B
Now let’s talk about Option B. Option B was to develop those negatives yourself in a darkroom. This took extra equipment, time, and you had to learn and practice, but eventually, the results were far superior and completely up to you! With Option B, you were in full control in the dark room. Exposure, white balance, selective dodging/burning, various papers and developers, your own secret little tricks, this was where some real artistry came in. Do you believe Ansel Adams’ photos looked like that straight out of the camera? Quite the opposite! That boy could spend a whole day in the darkroom developing a single image. He was the master of Photoshop decades before it even existed.
So now let’s come back to modern day photography and talk about digital. With the digital
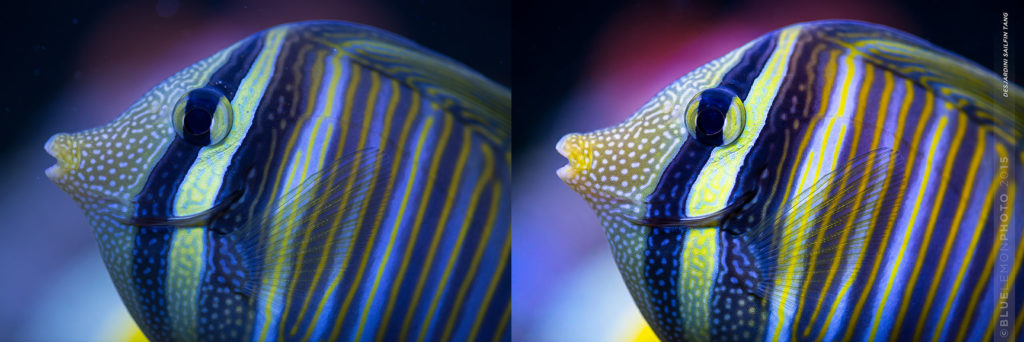
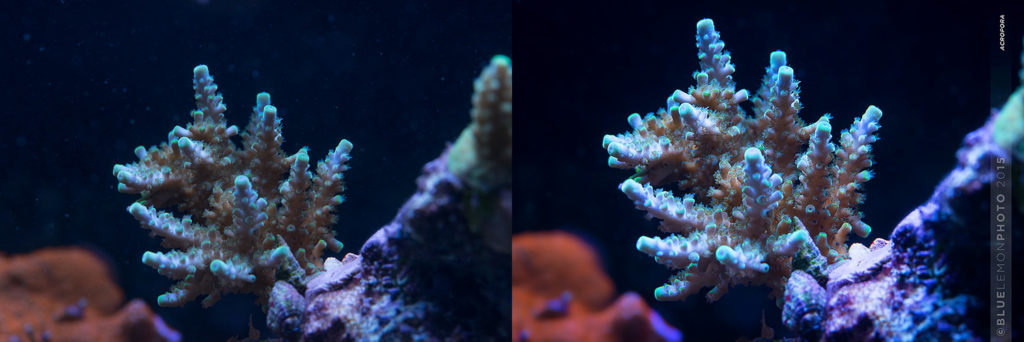
On the other hand, If you shoot in raw, that’s like starting with the negative. It will look a little more flat/dull than you may wish when initially downloaded to your computer, but the amount of pixel information is massive in comparison to your jpg. So now when you import it into software like Lightroom or Photoshop, you can do ANYTHING you want to it. Is it overly blue? You can fix that. Does it need more contrast? Done. Did you lose all the detail in your shadows? You can bring those back. Want to make multiple versions without taking up extra hard disk space? No problem, make as many as you like. You choose how the photo is developed so it reflects your vision.
On the other hand, If you shoot in raw, that’s like starting with the negative. It will look a little more flat/dull than you may wish when initially downloaded to your computer, but the amount of pixel information is massive in comparison to your jpg. So now when you import it into software like Lightroom or Photoshop, you can do ANYTHING you want to it. Is it overly blue? You can fix that. Does it need more contrast? Done. Did you lose all the detail in your shadows? You can bring those back. Want to make multiple versions without taking up extra hard disk space? No problem, make as many as you like. You choose how the photo is developed so it reflects your vision.
BUT WAIT… THERE’S MORE!
Not only all that, but Lightroom is a fantastic organizational tool and it lets you organize all your photos any way you see fit. By year, by shoot, by subject, or whatever else you decide. You can keyword, create collections, add a watermark, export images in different size/formats, export to other apps… It’s a very powerful piece of software.
So if you want to get the most out of your photos, learn how to develop them and don’t leave it up to some engineer sitting in a cube at Nikon or Canon corporate offices.
For what it’s worth, I use Lightroom to organize and process every single one of my photos, and I make final tweaks in Photoshop where I also apply my watermark. Adobe has the combo available for $10/month. Not too bad. There are also some free raw developers out there, but I don’t have personal experience with any of them.
I hope this post has inspired you to at least give raw a try. I think that if you take some time to play around and learn the software, you will soon see that you can really improve your photography and have a lot more fun with it.
I sometimes link directly to products and services that I REALLY like and think you may enjoy or find useful as well. If you buy them, I may get a small share of the revenue from the sale from our partners.


You May Also Like
